 Save
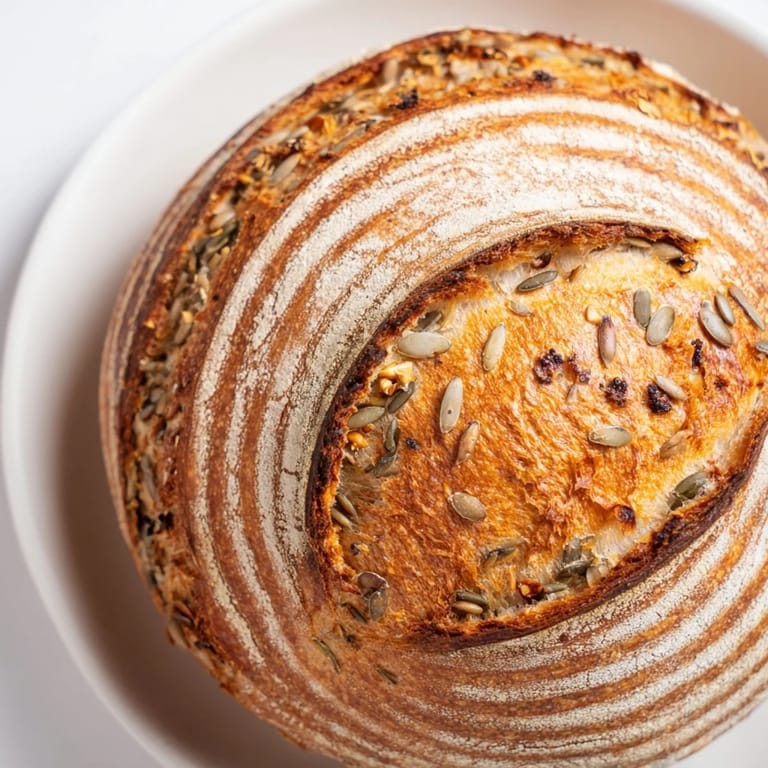
Save I'll never forget the afternoon I discovered the Fibonacci spiral in nature while kneading bread. A pinecone sat on my kitchen counter, and as I worked the dough, I noticed how its segments spiraled outward in perfect mathematical harmony. That moment sparked an obsession: what if I could capture that same growth pattern in bread? I spent weeks experimenting, layering ingredients in increasing amounts, building density spiral by spiral. The first time I pulled that golden loaf from the oven and saw the spiral emerge, I knew I'd found something magical. This bread isn't just food—it's edible mathematics, a conversation between art and sustenance.
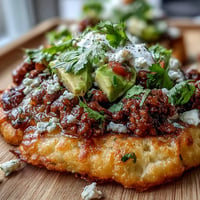
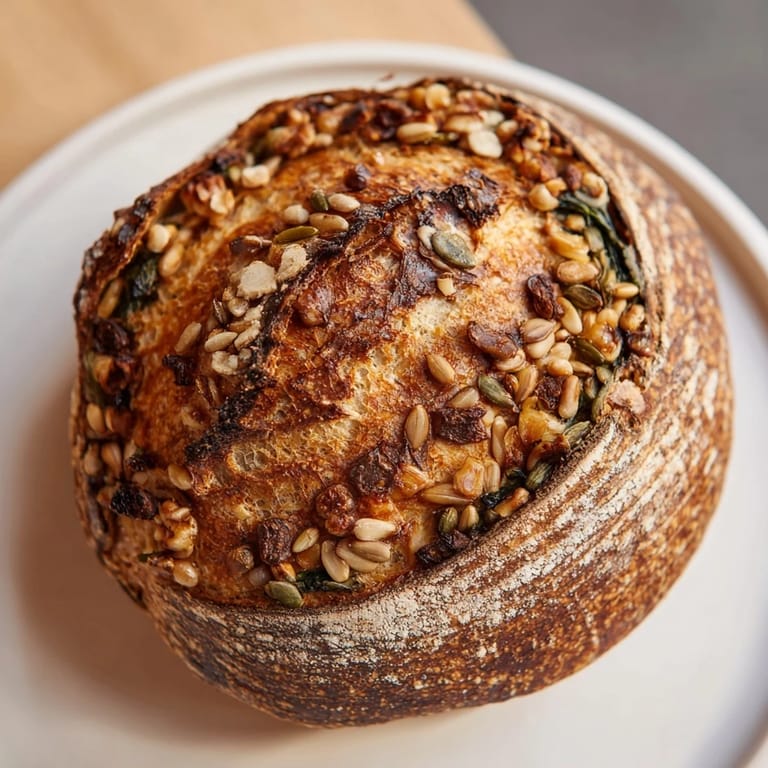
I remember making this bread for a dinner party where someone said they only ate store-bought loaves. When I sliced it at the table and that spiral revealed itself, the whole table went quiet. Then came the taste—crispy crust giving way to tender, seed-studded crumb with pockets of cheese and the bright punch of sun-dried tomato. That person asked for the recipe before dessert. That's when I knew this bread had crossed from personal project into something worth sharing.
Ingredients
- Strong bread flour (500 g): The protein content here matters more than you might think. Bread flour has about 12–14% protein, which builds the gluten network needed to hold all those spiral additions. I learned the hard way that cake flour won't give you the structure you need for this level of ingredient layering.
- Water, lukewarm (350 ml): Lukewarm means around 30–35°C—warm enough that it feels pleasant on your inner wrist but not hot enough to damage the yeast. Temperature matters because cold water slows fermentation unpredictably, while hot water can kill your culture.
- Sourdough starter or instant yeast (100 g or 7 g): If using sourdough, make sure it's active and bubbly, fed within 4–8 hours before mixing. If using instant yeast, don't skip the rest and fermentation time—the long rise is what develops flavor and structure.
- Fine sea salt (10 g): Salt strengthens gluten and controls fermentation speed. It seems like a small ingredient, but weigh it rather than eyeballing. I once guessed and under-salted the dough; it over-proofed and collapsed.
- Olive oil (15 ml): This adds richness and keeps the crumb tender. It also prevents the spiral segments from drying as they proof.
- Toasted sunflower seeds (20 g): Toasting them first deepens their nutty flavor and adds a subtle crunch. Raw seeds can taste a bit raw and watery in bread.
- Chopped walnuts (30 g): Walnuts bring an earthy bitterness that balances sweet elements like sun-dried tomatoes. Toast them lightly if you want more intensity.
- Pumpkin seeds (40 g): Their slight pepperiness complements the cheese beautifully. They also add visual contrast to the crumb.
- Hard cheese, grated (50 g—Gruyère or Parmesan): Gruyère adds a nutty sweetness while Parmesan brings sharp, umami depth. Hard cheese melts into the dough instead of creating watery pockets like softer cheeses would.
- Sun-dried tomatoes, chopped and drained (60 g): Draining them is crucial—excess oil or packing liquid can make that segment greasy and prevent proper gluten development. If they're very oily, blot them with paper towels.
- Pitted and chopped olives (70 g): The saltiness here adds another layer of flavor. Use olives you actually like eating, because you'll taste them clearly in each bite.
- Sautéed spinach, well-drained (80 g): Sautéing the spinach first removes its moisture and prevents the dough from becoming soggy. I learned this after making a spinach segment that felt gluey. Now I squeeze it in a kitchen towel until it's almost dry.
Tired of Takeout? 🥡
Get 10 meals you can make faster than delivery arrives. Seriously.
One email. No spam. Unsubscribe anytime.
Instructions
- Bring flour and water together in rest:
- Pour your warm water into the flour and stir until there are no dry specks left. The dough will be shaggy and rough—that's exactly right. This 30-minute rest, called an autolyse, is where magic starts. The flour hydrates fully and gluten begins forming naturally without you even kneading yet. Cover the bowl with a damp towel and set a timer.
- Activate your culture and build the dough:
- After the rest, add your active starter (or yeast), salt, and olive oil. If using sourdough starter, stir it in thoroughly. If using instant yeast, mix it with a tablespoon of water first so it distributes evenly. Now knead on a lightly floured surface for 8–10 minutes. Your hands will feel sticky at first, but keep going. The dough transforms from chaotic to smooth and elastic—this is when you know gluten is properly developed. It should feel alive and slightly bouncy.
- Let time do the heavy lifting:
- Oil your bowl lightly, place the dough inside, and cover it loosely. This long overnight rise at room temperature is where flavor develops. You're building complexity—organic acids, subtle fermented notes that store-bought bread simply cannot have. Check it after 8 hours; it should look roughly doubled, with some bubbles visible on top. If your kitchen is cold, it might take the full 12 hours, and that's fine. Patience here is your secret weapon.
- Divide and portion carefully:
- Turn your risen dough onto a lightly floured surface. Using a dough scraper or bench knife, divide it into 7 equal portions by weight if you have a scale, or by eye if you're eyeballing it. You want them roughly the same size—they'll become increasingly dense as you add ingredients, so equal starting size keeps the spiral balanced.
- Build your spiral additions, smallest to largest:
- Take your first portion and gently knead the toasted sunflower seeds into it until they're evenly distributed. This takes about 2–3 minutes of patient folding and pressing. Now take portion two and knead in the walnuts. Continue this process, moving through seeds, nuts, cheese, sun-dried tomatoes, olives, and finally spinach. Each addition represents the next Fibonacci number in your spiral, and by the time you reach the spinach, that final portion feels noticeably heavier and richer. This is the beauty of the design—each segment tells a different story when sliced.
- Coil into the Fibonacci spiral:
- Roll each portion into a rope about as thick as your thumb. Start with your smallest rope and, on a parchment-lined baking sheet, coil it into a tight spiral around a central point. Now take the walnut rope and wrap it around that first spiral. Continue coiling, largest rope last, building outward. Where each rope ends, press the beginning of the next rope firmly into it to seal the connections. Don't worry about perfection—it will look organic and beautiful precisely because it isn't mechanically perfect.
- Let the spiral proof and puff:
- Cover loosely with a damp kitchen towel. After 45 minutes, you should see visible puffing. After 1.5 hours, the spiral will look proud and puffy, almost pillowy. You want it risen but not over-proofed—if you press it gently with a floured finger, the indent should spring back halfway.
- Prepare your oven for steam and crust:
- Preheat to 230°C (445°F). This high heat creates a dramatic crust. Place an empty metal tray on the oven bottom—this is where you'll pour hot water to create steam. Steam is what gives you that crispy, shattering crust that contrasts beautifully with the tender crumb inside.
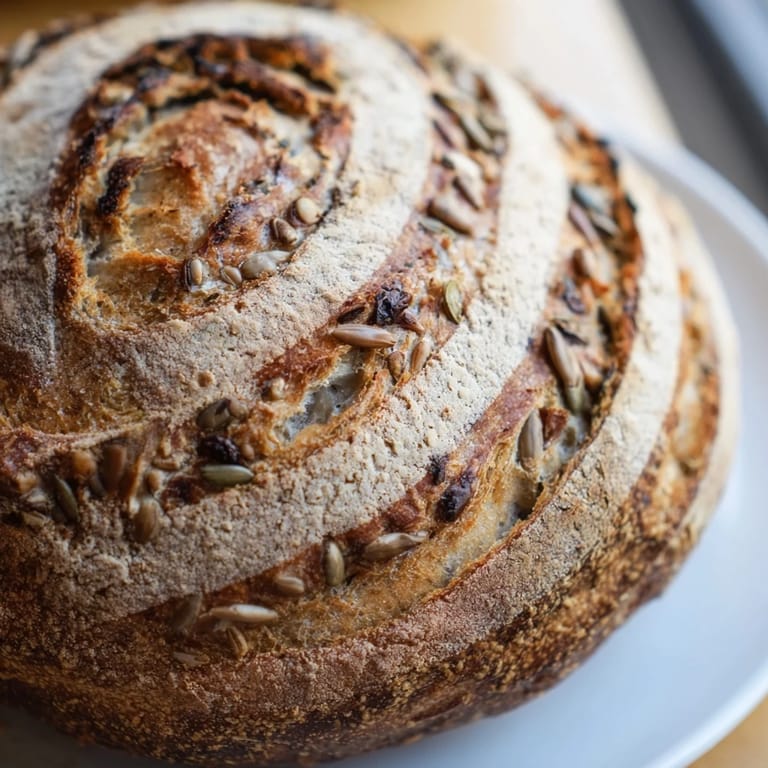
- Score for expansion and visual drama:
- Dust your spiral lightly with flour using a fine sieve. Using a sharp blade or bread lame, score lines that follow the spiral's direction. These aren't random slashes—they're intentional marks that both control how the bread expands and add visual interest. Score lightly; you're guiding the expansion, not cutting deeply through the layers.
- Bake with steam and rotation:
- Carefully pour a cup of hot water into the oven tray. Immediately place your spiral bread on the middle rack. The steam will immediately envelop it, softening the surface and allowing maximum oven-spring. Bake for 20 minutes without opening the oven. Then, rotate the baking sheet 180 degrees—this ensures even browning. Bake another 20 minutes until the crust is deep golden brown and sounds hollow when tapped underneath. If it feels soft, give it another 5 minutes.
- Cool completely before revealing the spiral:
- Place your finished loaf on a wire rack. This is the hardest part because it smells absolutely incredible, but you must wait. As it cools, the crumb sets. If you slice it while warm, the interior is still steaming and will tear. A full cool takes 2–3 hours. When you finally slice it, you'll see your Fibonacci spiral in cross-section, each layer distinct and beautiful.
 Save
Save There was a moment when I realized this bread had become more than a technical project. A friend who had struggled with anxiety asked if they could watch me make it—just sit in the kitchen while I worked. As they watched the spiral come together, something shifted in their expression. When they took the first bite later, they actually closed their eyes. They told me later that the entire process had reminded them that beautiful things take time, and that you can't rush transformation. That loaf became their permission to slow down.
The Science of Spiral Growth in Bread
The Fibonacci sequence appears throughout nature because it represents growth efficiency—pine cones, sunflowers, nautilus shells. In this bread, each spiral segment literally grows in volume and ingredient density, mirroring the pattern nature uses. When you layer ingredients from lightest to heaviest, you're not just creating visual interest; you're also managing moisture and fermentation. Lighter segments with seeds ferment quickly and dry slightly, while heavier segments with vegetables retain moisture. This variation in texture creates complexity when sliced and eaten. The spiral structure also means that each cross-section of the loaf tells a complete story—every ring shows the full ingredient spectrum from sunflower seeds to spinach, which is why no two slices taste quite identical even though they came from the same loaf.
Variations and Your Creative Choices
While the recipe lists specific ingredients, the beauty of the spiral design is that you can adapt it to what you have and what you love. The increasing quantities (20 g, 30 g, 40 g, and so on) matter more than the specific ingredients. I've made versions with roasted beets, aged cheddar, fresh herbs, and even some with spicy additions like red pepper flakes mixed into one segment. The only rule is: as you move outward through the spiral, you're adding more volume and more boldness of flavor. A lighter inner spiral might be just seeds and mild cheese, while the outer spiral could include all your most aggressive flavors.
Serving, Storage, and Sharing
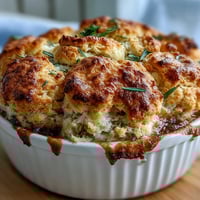
This bread is stunning when sliced at the table—it's an event, a centerpiece. Serve it warm or at room temperature with good olive oil for dipping, herbed butter, or simply on its own. The crumb stays tender for about two days wrapped in cloth (not plastic, which traps steam and makes the crust soggy). After that, it's still delicious toasted. If you make it ahead for entertaining, you can freeze the shaped, pre-proofed spiral before the final rise. Defrost it overnight and proceed with the final proof and bake. This is one of those breads that justifies the effort because people remember it—not as just bread, but as an experience.
- Slice with a serrated knife using a gentle sawing motion; a sharp blade can compress the crumb
- Freeze cooled loaves whole, tightly wrapped, for up to one month
- Toasting day-old slices revives the crust and brings back the warmth and aroma
 Save
Save This bread taught me that sometimes the most meaningful creations are the ones that take time and require you to slow down. Every spiral you build, every addition you fold in, is an act of intention.
Recipe FAQs
- → What makes the spiral pattern unique in this bread?
The bread is shaped into a coil with progressively larger segments, each mixed with different ingredients like seeds and cheeses, creating a visually striking spiral effect.
- → Can I substitute the cheese for a vegan option?
Yes, you can omit the cheese or replace it with a plant-based alternative to keep the loaf vegan-friendly without compromising texture.
- → How long should the dough rise before baking?
The dough undergoes a long fermentation period of 10–12 hours at room temperature, followed by a second 1.5-hour rise after shaping the spiral.
- → What is the purpose of adding different ingredients in each spiral segment?
This layering technique gradually increases density and flavor, ensuring each bite offers a unique combination of textures and tastes.
- → How is steam used during baking?
Hot water is poured into a tray at the oven’s bottom to create steam, which helps develop a crispy crust and proper oven spring.