 Save
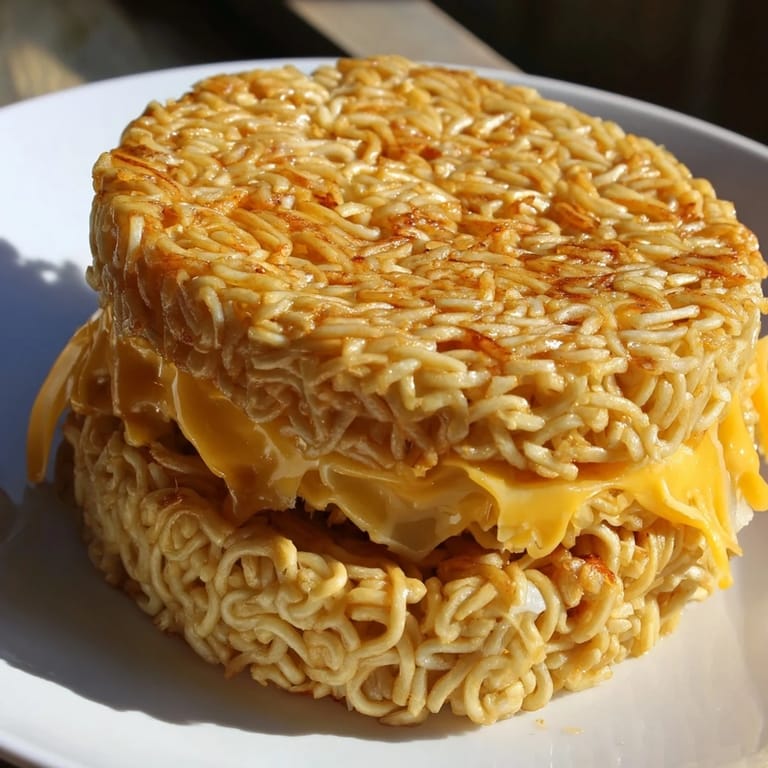
Save I discovered this dish completely by accident one late night when I was staring into my mostly empty pantry, desperately hungry but too tired to order takeout. A forgotten pack of ramen caught my eye next to a block of cheddar, and something clicked—what if I could skip the bowl entirely and turn those noodles into something crispy and handheld? Twenty minutes later, I was biting into golden, crunchy ramen noodles oozing with melted cheese, and I haven't looked back since.
My roommate walked in while I was flipping the second sandwich and just stood there watching the cheese ooze out the sides, then asked if he could have one too. We ended up making three more at midnight, sitting on the kitchen counter in our pajamas, laughing about how something this good came from pure desperation and a half-empty pantry.
Ingredients
- Instant ramen noodles (2 packs, 3 oz each): Cook them until tender, then drain really well—any excess water will make your buns soggy and weak, which I learned the hard way.
- Large eggs (2): These act as your binder, holding the noodles together so they stay crispy instead of falling apart.
- Black pepper (1/4 teaspoon): A small amount that adds a gentle warmth without overwhelming the cheese.
- Garlic powder (1/4 teaspoon, optional): Skip it if you want pure cheesy simplicity, or add it for a savory depth.
- Shredded mozzarella (1 cup): The mozzarella melts smoothly and stays stretchy, creating those satisfying cheese pulls.
- Shredded cheddar (1 cup): Cheddar brings sharp, tangy flavor that makes the whole thing taste less one-note.
- Unsalted butter or neutral oil (2 tablespoons): Use more than you think you need for cooking—these noodle buns need fat to get properly crispy.
Tired of Takeout? 🥡
Get 10 meals you can make faster than delivery arrives. Seriously.
One email. No spam. Unsubscribe anytime.
Instructions
- Cook and cool the ramen:
- Boil your ramen for 2-3 minutes until just tender, then drain it thoroughly in a colander. Let it cool for a minute or two so it's easier to handle without burning yourself.
- Bind with eggs:
- Beat the eggs with pepper and garlic powder in a bowl, then add the cooked noodles and mix everything together until every strand is coated. This is what holds the whole thing together.
- Shape your buns:
- Divide the noodle mixture into 4 portions and press each one firmly into a round patty about the size of a burger bun. A ring mold or a small bowl lined with plastic wrap makes this easier and gives you even, professional-looking shapes.
- Crisp the buns:
- Heat butter in your skillet over medium heat and cook each noodle patty for 3-4 minutes per side until it's golden brown and crispy on the outside. You'll hear a satisfying sizzle and smell the noodles toasting—that's the magic moment.
- Assemble the sandwich:
- Place half your cheese mixture on one bun, top it with the second bun, and press gently so the cheese starts melting from the warmth.
- Melt and finish:
- Return the assembled sandwich to the skillet with fresh butter over medium-low heat and cook for 2-3 minutes per side, pressing lightly, until the cheese is completely melted and the buns are golden and crispy again. Slice it open carefully so the cheese doesn't all run out onto the plate.
 Save
Save My friend who claims she doesn't like fusion food tried one of these almost reluctantly, and I watched her eyes light up mid-bite. It became our inside joke that this silly sandwich converted her, and now she requests it whenever she comes over.
Playing with Flavor
The beauty of this recipe is that it's incredibly flexible once you understand the basic technique. I've added sliced scallions for a sharp bite, drizzled sriracha on the inside for heat, and even layered in kimchi for a funky, fermented kick that somehow works perfectly with the melted cheese. The cheese blend matters too—while mozzarella and cheddar are perfect for beginners, try swapping in Gruyère for earthiness, provolone for tanginess, or fontina for extra richness if you want to dress it up.
What Makes It Work
The genius of this dish is the textural contrast—you get crispy, almost-fried noodles on the outside with molten, gooey cheese in the middle. It's comfort food and crunchy food at the same time, which is why people who try it tend to get a little obsessed. The fusion of instant ramen and classic grilled cheese somehow feels like it was always meant to be, even though nobody really makes it this way.
Serving and Sides
Eat it straight from the skillet while it's still steaming, or let it cool for just a minute if you're worried about burning your mouth—the cheese will still be melted and perfect. I've learned that pairing it with something bright and light actually makes the meal feel less heavy than you'd expect. A side of tomato soup is the obvious choice and works beautifully, but a crisp salad with sharp vinaigrette, some fresh fruit, or even pickled vegetables can balance out the richness and make you feel less like you've made a questionable 2 a.m. food decision.
- Serve immediately while everything is hot and crispy, before the cheese starts to set.
- Have napkins handy because the cheese will escape and you will not be sad about it.
- This is best eaten fresh, but leftovers can be gently reheated in a skillet to restore some crispiness.
 Save
Save This dish proves that some of the best food moments come from improvisation and hunger rather than planning. It's become my go-to when I want something that feels indulgent and surprising without any of the pretension.
Recipe FAQs
- → How do I make the ramen buns crispy?
Cook the noodle patties in a hot skillet with butter or oil for 3–4 minutes on each side until golden brown and crisp.
- → Can I use other types of cheese for the filling?
Yes, cheeses like Gruyère, provolone, or fontina work well as meltable alternatives.
- → Is it necessary to discard the ramen seasoning packets?
Discarding the seasoning avoids excess salt and artificial flavors, letting you control the taste better.
- → How can I shape the ramen buns evenly?
Use a ring mold or small bowl lined with plastic wrap to press the noodle mixture into round, uniform patties.
- → What additional flavors can I add inside the sandwich?
Try adding sliced scallions, sriracha, or kimchi for an extra layer of flavor and spice.