 Save
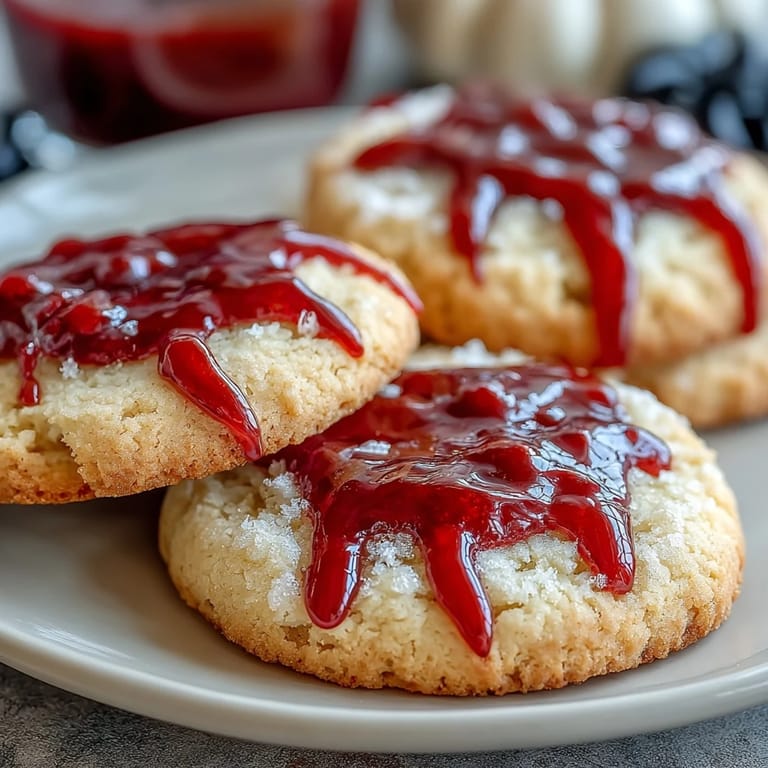
Save My neighbor knocked on the door mid-October holding a plate of these vampire bite cookies, and I was instantly hooked—not just by how wickedly fun they looked, but by how effortlessly she'd nailed that balance between elegant butter cookie and pure Halloween theater. The moment I bit into one and tasted that buttery softness paired with the glossy red icing, I knew I had to figure out how to make them myself. What started as a casual request turned into my go-to dessert for every October gathering, and honestly, they've become something people actually ask me to bring now. There's something deeply satisfying about creating something that looks intimidating but tastes like comfort.
I'll never forget the Halloween party where I set these out and watched a group of adults go silent, staring at the plate like they'd forgotten what it felt like to be delighted by a cookie. Someone's kid grabbed three in a row without asking, and instead of being annoyed, the parent just laughed and said, "Yeah, I'd do the same." That's when I realized this recipe wasn't just about decoration—it was about giving people permission to be playful and enjoy something beautiful.
Ingredients
- All-purpose flour (2 1/4 cups): The foundation of a tender cookie; make sure it's fresh and lightly spoon it into your measuring cup rather than scooping directly from the bag, which packs it down.
- Unsalted butter (3/4 cup): Softened butter creams properly and lets the sugar shine; using salted butter will throw off the flavor balance you've carefully built.
- Granulated sugar (1 cup): This creates the slight crumb and structure; don't swap for brown sugar or you'll end up with a different texture entirely.
- Egg (1 large): Room temperature eggs incorporate smoothly and create a better crumb structure than cold eggs straight from the fridge.
- Pure vanilla extract (1 1/2 tsp): The real stuff makes a noticeable difference; imitation vanilla tastes thin and flat by comparison.
- Baking powder (1/2 tsp): Just enough to give lift without making them cakey—too much and they'll spread thin.
- Salt (1/4 tsp): A small amount deepens the vanilla and butter flavor in ways people can't quite identify but definitely taste.
- Powdered sugar (1 cup): Sift it before mixing into the icing or you'll end up with tiny lumps that catch on the toothpick.
- Milk (2-3 tsp): Add slowly; the exact amount depends on humidity and how thick you want the icing to drip.
- Light corn syrup (1/2 tsp): This creates the glossy, wet shine that makes the icing look genuinely blood-like instead of matte and flat.
- Red gel food coloring: Gel is more concentrated than liquid, so a tiny amount goes further and keeps the icing from getting watery.
Tired of Takeout? 🥡
Get 10 meals you can make faster than delivery arrives. Seriously.
One email. No spam. Unsubscribe anytime.
Instructions
- Preheat and prep your workspace:
- Set the oven to 350°F and line two baking sheets with parchment paper—this prevents sticking and ensures even browning on the bottom. If your kitchen feels warm or humid, you can chill the dough for 30 minutes after mixing, though it's not mandatory.
- Combine the dry ingredients:
- Whisk together the flour, baking powder, and salt in a medium bowl and set it aside. This distributes the leavening evenly so you don't end up with dense pockets in your cookies.
- Cream butter and sugar:
- Beat softened butter and granulated sugar together for about 2 minutes until it's pale, fluffy, and noticeably lighter in color. This incorporates air into the dough, which creates a tender crumb instead of a dense cookie.
- Add moisture and flavor:
- Drop in the egg and vanilla extract, mixing until everything is smooth and combined. Don't overmix at this stage or you'll develop too much gluten and end up with tough cookies.
- Bring dough together:
- Add the flour mixture on low speed, stirring until you just can't see dry flour anymore. A soft, slightly sticky dough should come together—resist the urge to overwork it.
- Shape and bake:
- Scoop tablespoon-sized portions, roll them gently into balls, and place them about 2 inches apart on the prepared baking sheets. Press each one down slightly with your palm, then bake for 10 to 12 minutes until the edges are just barely golden.
- Cool properly:
- Leave the cookies on the baking sheet for 5 minutes so they can set, then transfer them to a wire rack to cool completely. If you skip this step and move them too early, they'll crumble; wait too long and they'll crack when you lift them.
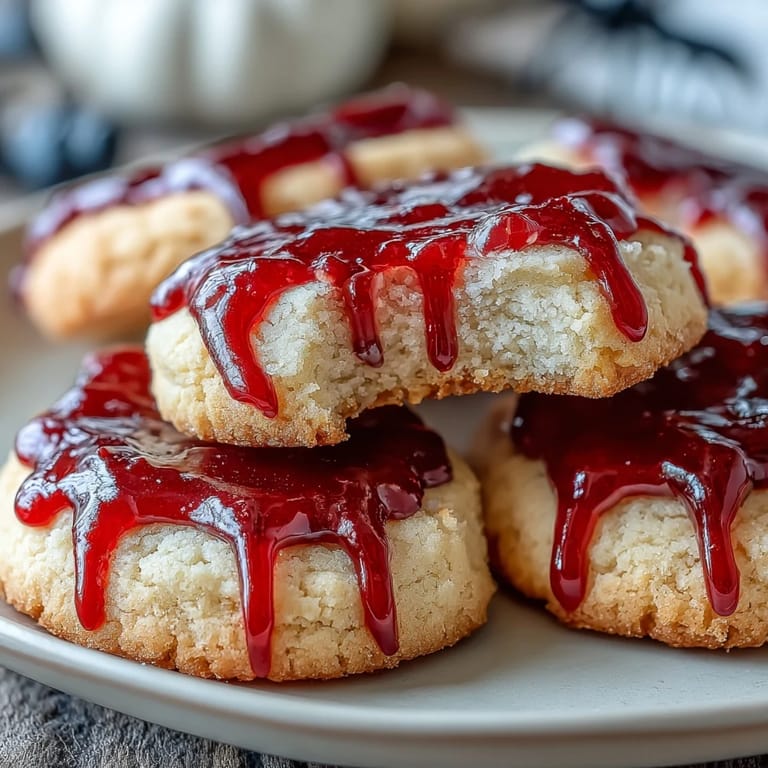
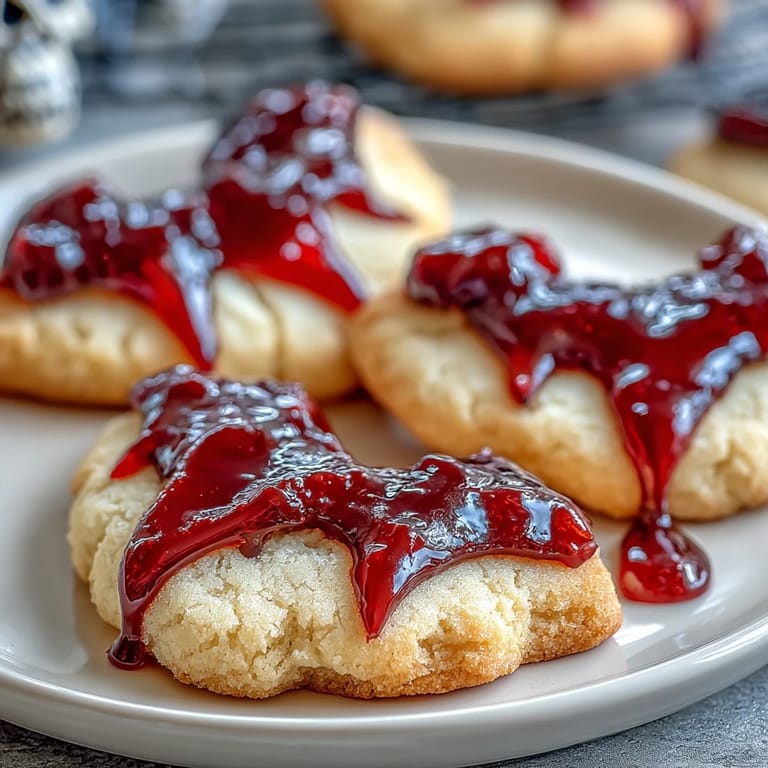
- Create the vampire puncture marks:
- Once the cookies are completely cool, use a clean straw, chopstick end, or toothpick to gently poke two small holes near the edge of each cookie, positioning them like fangs might have struck. Push slowly and deliberately rather than jabbing, or you might crack the cookie.
- Make the blood icing:
- Sift the powdered sugar into a small bowl, then add milk one teaspoon at a time while whisking, adding the corn syrup and red gel coloring as you go. You want a consistency that's thick enough to hold its shape but fluid enough to drip slightly when piped.
- Fill and decorate:
- Using a toothpick, small spoon, or piping bag with a fine tip, carefully fill the bite marks with red icing and let it pool and drip naturally down the edge of the cookie. For extra effect, pipe a thin trail of icing from the bite marks as if blood is running down, then optionally add dark red or black detail icing for fangs or shadows before the icing sets.
 Save
Save There was one moment where a friend bit into one of these at a dinner party and actually closed her eyes, and it hit me that the best part of cooking isn't impressing people with technique—it's creating something that makes them pause and feel a little joy. These cookies do that.
The Secret to Soft, Buttery Centers
The magic happens in the first two minutes of creaming butter and sugar, when you're essentially whipping air into the mixture until it looks lighter in color and fluffy in texture. Most people rush this step, but those two minutes are what separates a dry, crumbly cookie from one that stays soft for days. I learned this the hard way after baking a batch that tasted like sand, and now I set a timer and actually watch for that visible transformation—it's worth the patience.
Why Gel Food Coloring Changes Everything
Liquid food coloring will make your icing runny and pale, requiring more sifting and stirring to get the color you want, and you still end up with something that looks diluted. Gel coloring is concentrated, so a tiny squeeze gives you deep, true red that looks intentional and theatrical, not like you dyed cookies for a children's birthday party. The first time I switched to gel, I couldn't believe how much more sophisticated the whole thing looked—and it's literally the same effort.
Make Them Your Own
Once you nail the base recipe, this is where you can get creative without breaking anything. I've added a quarter teaspoon of almond extract for a subtle nod to old-fashioned butter cookies, and I've seen people dust the finished cookies with edible glitter or top them with a tiny candy pebble for an eyeball effect.
- Try a 1/4 tsp of almond extract mixed into the butter and sugar for a sophisticated twist that pairs beautifully with the vanilla.
- Experiment with black icing details to create fangs, shadows, or dripping effects that make the bite marks look even more dramatic.
- Use edible markers or gel icing to add tiny veins or details once the main red icing has set.
 Save
Save These cookies have become my Halloween signature, the thing people remember and ask for by name, which is exactly what happens when you combine something that tastes genuinely good with a moment of pure, unashamed fun. Make them and watch what happens.
Recipe FAQs
- → What makes the cookies soft and buttery?
The combination of softened unsalted butter and granulated sugar creamed together creates a tender, soft texture. The gentle baking time also helps maintain softness.
- → How is the red icing made shiny?
Adding a small amount of light corn syrup to the powdered sugar and milk mixture gives the icing a glossy, slightly translucent appearance.
- → What tool can create the bite marks on cookies?
A straw or the end of a chopstick is gently pressed into each cooled cookie to form the distinctive bite indentations.
- → Can these cookies be made gluten-free?
Yes, all-purpose flour can be substituted with gluten-free flour blends that work similarly in texture and structure.
- → How should the cookies be cooled before icing?
After baking, allow cookies to cool on the baking sheet for 5 minutes, then transfer to a wire rack to cool completely before applying icing.
- → Are there any tips for decorating the icing details?
Using a toothpick or small piping bag allows precise filling of bite marks with red icing, while optional black or dark red gel icing adds intricate details.